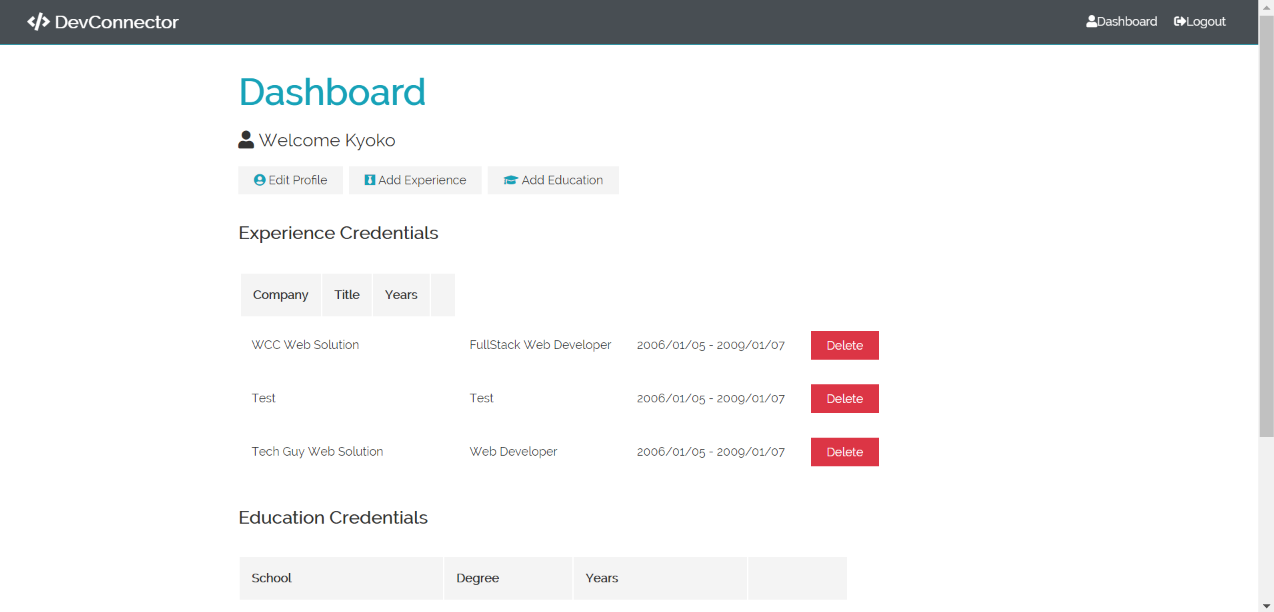
ダッシュボードが形になってきました。ユーザーが学歴・教育や仕事経験を記入・削除できるようにして、Webアプリケーションからのアカウント削除もできるようにコーディングしました。本日は、昨日目標にしていた通り、Udemyのレクチャーを2つ完了させることができました!
①client/src/components/dashboard/Education.js 新ファイル作成で学歴や教育を記入・削除できるようにする. React でmoment & Momentを使用して日時表示をわかりやすくする
今回初めて、Momentとmomentをimportしたのですが、import Moment from 'react-moment'; の方は大文字で、import moment from 'moment';の方は小文字なのでそこは気をつけなければと感じました。Reactは便利な機能が沢山あって、全ては覚えきれないかもしれませんが、新しいやり方はどんどん取り入れていきたいです。
momentの使い方についてわかりやすい記事が公開されていました。例として、いくつものコード例があります。
⇒Using Moment JS in React Native (Sudhir Kumar in Better Programming)
import React, { Fragment } from "react";
import PropTypes from "prop-types";
import Moment from "react-moment";
import moment from "moment";
import { connect } from "react-redux";
import { deleteEducation } from "../../actions/profile";

const Education = ({ education, deleteEducation }) => {
  const educations = education.map(edu => (
    <tr key={edu._id}>
      <td>{edu.school}</td>
      <td className='hide-sm'>{edu.degree}</td>
      <td>
        <Moment format='YYYY/MM/DD'>{moment.utc(edu.from)}</Moment> -{" "}
        {edu.to === null ? (
          " Now"
        ) : (
          <Moment format='YYYY/MM/DD'>{moment.utc(edu.to)}</Moment>
        )}
      </td>
      <td>
        <button
          onClick={() => deleteEducation(edu._id)}
          className='btn btn-danger'
        >
          Delete
        </button>
      </td>
    </tr>
  ));

  return (
    <Fragment>
      <h2 className='my-2'>Education Credentials</h2>
      <table className='table'>
        <thead>
          <tr>
            <th>School</th>
            <th className='hide-sm'>Degree</th>
            <th className='hide-sm'>Years</th>
            <th />
          </tr>
        </thead>
        <tbody>{educations}</tbody>
      </table>
    </Fragment>
  );
};

Education.propTypes = {
  education: PropTypes.array.isRequired,
  deleteEducation: PropTypes.func.isRequired
};

export default connect(
  null,
  { deleteEducation }
)(Education);
②client/src/components/dashboard/Experience.js 新ファイル作成。仕事の経験についてもリスト形式で記入できるようにする
Education.jsをコピペしてきて、必要部分のみ書き換えました。様式はほぼ同じです。
import React, { Fragment } from "react";
import PropTypes from "prop-types";
import Moment from "react-moment";
import { connect } from "react-redux";
import { deleteExperience } from "../../actions/profile";

const Experience = ({ experience, deleteExperience }) => {
  const experiences = experience.map(exp => (
    <tr key={exp._id}>
      <td>{exp.company}</td>
      <td className='hide-sm'>{exp.title}</td>
      <td>
        <Moment format='YYYY/MM/DD'>{exp.from}</Moment> -{" "}
        {exp.to === null ? (
          " Now"
        ) : (
          <Moment format='YYYY/MM/DD'>{exp.to}</Moment>
        )}
      </td>
      <td>
        <button
          onClick={() => deleteExperience(exp._id)}
          className='btn btn-danger'
        >
          Delete
        </button>
      </td>
    </tr>
  ));

  return (
    <Fragment>
      <h2 className='my-2'>Experience Credentials</h2>
      <table className='table'>
        <thread>
          <tr>
            <th>Company</th>
            <th className='hide-sm'>Title</th>
            <th className='hide-sm'>Years</th>
            <th />
          </tr>
        </thread>
        <tbody>{experiences}</tbody>
      </table>
    </Fragment>
  );
};

Experience.propTypes = {
  experience: PropTypes.array.isRequired,
  deleteExperience: PropTypes.func.isRequired
};

export default connect(
  null,
  { deleteExperience }
)(Experience);
③client/src/components/dashboard/Dashboard.jsに学歴・教育・経験・アカウント削除についての情報を書き加える
元々あったDashboard.jsにもアカウント削除についての情報を書き加えました。具体的には、deleteAccountの部分、Fragment内のExperienceとEducationの部分、アカウント削除のボタン作成、最後の部分のpropTypesやconnectの書き換えです。
import React, { Fragment, useEffect } from "react";
import { Link } from "react-router-dom";
import PropTypes from "prop-types";
import { connect } from "react-redux";
import Spinner from "../layout/Spinner";
import DashboardActions from "./DashboardActions";
import Experience from "./Experience";
import Education from "./Education";
import { getCurrentProfile, deleteAccount } from "../../actions/profile";

const Dashboard = ({
  getCurrentProfile,
  deleteAccount,
  auth: { user },
  profile: { profile, loading }
}) => {
  // eslint-disable-next-line
  useEffect(() => {
    getCurrentProfile();
  }, []);

  return loading && profile === null ? (
    <Spinner />
  ) : (
    <Fragment>
      <h1 className='large text-primary'>Dashboard</h1>
      <p className='lead'>
        <i className='fas fa-user' /> Welcome {user && user.name}
      </p>
      {profile !== null ? (
        <Fragment>
          <DashboardActions />
          <Experience experience={profile.experience} />
          <Education education={profile.education} />

          <div className='my-2'>
            <button className='btn btn-danger' onClick={() => deleteAccount()}>
              <i className='fas fa-user-minnus' /> Delete My Account
            </button>
          </div>
        </Fragment>
      ) : (
        <Fragment>
          <p>You have not yet setup a profile, please add some info</p>
          <Link to='/create-profile' className='btn btn-primary my-1'>
            Create Profile
          </Link>
        </Fragment>
      )}
    </Fragment>
  );
};

Dashboard.propTypes = {
  getCurrentProfile: PropTypes.func.isRequired,
  deleteAccount: PropTypes.func.isRequired,
  auth: PropTypes.object.isRequired,
  profile: PropTypes.object.isRequired
};

const mapStateToProps = state => ({
  auth: state.auth,
  profile: state.profile
});

export default connect(
  mapStateToProps,
  { getCurrentProfile, deleteAccount }
)(Dashboard);
④client/src/actions/profile.jsに学歴・教育・アカウントの削除について書き加える
まずは、import部分から。
import {
  GET_PROFILE,
  PROFILE_ERROR,
  UPDATE_PROFILE,
  CLEAR_PROFILE,
  ACCOUNT_DELETED
} from "./types";
そして、学歴・教育・アカウントの削除についてのコーディングです。これまで書いてきたコード(学歴の追加など)とほぼ同じコードの書き方でした。情報の追加ではaxios.putとしていたところを、情報の削除をするためにaxios.deleteにしました。
また、アカウント削除については、一度消すと元に戻れないのでwindow.confirm()を使って一度アラートを出してから、アカウント削除に進む手順になっています。
//Delete experience

export const deleteExperience = id => async dispatch => {
  try {
    const res = await axios.delete(`/api/profile/experience/${id}`);

    dispatch({
      type: UPDATE_PROFILE,
      payload: res.data
    });

    dispatch(setAlert("Experience Removed", "success"));
  } catch (err) {
    dispatch({
      type: PROFILE_ERROR,
      payload: { msg: err.response.statusText, status: err.response.status }
    });
  }
};

//Delete education

export const deleteEducation = id => async dispatch => {
  try {
    const res = await axios.delete(`/api/profile/education/${id}`);

    dispatch({
      type: UPDATE_PROFILE,
      payload: res.data
    });

    dispatch(setAlert("Education Removed", "success"));
  } catch (err) {
    dispatch({
      type: PROFILE_ERROR,
      payload: { msg: err.response.statusText, status: err.response.status }
    });
  }
};

//Delete account

export const deleteAccount = () => async dispatch => {
  if (window.confirm("Are you sure? This can NOT be undone!")) {
    try {
      const res = await axios.delete(`/api/profile/`);

      dispatch({ type: CLEAR_PROFILE });
      dispatch({ type: ACCOUNT_DELETED });

      dispatch(setAlert("Your account has been permanently deleted"));
    } catch (err) {
      dispatch({
        type: PROFILE_ERROR,
        payload: { msg: err.response.statusText, status: err.response.status }
      });
    }
  }
};
⑤client/src/actions/types.jsにアカウント削除について書き加える。
types.jsに書き加えたのは一行のみで、ACCOUNT_DELETEDの情報のみです。
export const ACCOUNT_DELETED = "ACCOUNT_DELETED";
⑥client/src.reducers/auth.jsにアカウント削除について書き加える。
まずは、import部分。そして、switch内のcase ACCOUNT_DELETEDという部分です。
import {
  REGISTER_SUCCESS,
  REGISTER_FAIL,
  USER_LOADED,
  AUTH_ERROR,
  LOGIN_SUCCESS,
  LOGIN_FAIL,
  LOGOUT,
  ACCOUNT_DELETED
} from "../actions/types";
switch内のcase ACCOUNT_DELETED。それぞれ一行のみの書き加えです。
export default function(state = initialState, action) {
  const { type, payload } = action;

  switch (type) {
    case USER_LOADED:
      return {
        ...state,
        isAuthenticated: true,
        loading: false,
        user: payload
      };
    case REGISTER_SUCCESS:
    case LOGIN_SUCCESS:
      localStorage.setItem("token", payload.token);
      return {
        ...state,
        ...payload,
        isAuthenticated: true,
        loading: false
      };
    case REGISTER_FAIL:
    case AUTH_ERROR:
    case LOGIN_FAIL:
    case LOGOUT:
    case ACCOUNT_DELETED:
      localStorage.removeItem("token");
      return {
        ...state,
        token: null,
        isAuthenticated: false,
        loading: false
      };
    default:
      return state;
  }
}
⑦routes/api/profile.jsで、ユーザーがポストしたコメントを削除できるようコーディング
ユーザーがポストしたコメントも削除できるように、一部書き加えました。
const Post = require("../../models/Post");
下記コードの中ではawait Post.deleteMany()の部分です。
// @route    DELETE api/profile
// @desc     Delete profile, user & posts
// @access   Private
router.delete("/", auth, async (req, res) => {
  try {
    // Remove user posts
    await Post.deleteMany({ user: req.user.id });
    // Remove profile
    await Profile.findOneAndRemove({ user: req.user.id });
    // Remove user
    await User.findOneAndRemove({ _id: req.user.id });

    res.json({ msg: "User deleted" });
  } catch (err) {
    console.error(err.message);
    res.status(500).send("Server Error");
  }
});
MongoDBでのdeleteMany()の使い方について(collection内のドキュメント削除)
今回deleteMany()を初めて使用したので、使い方を調べてみたところ、MongoDBでコレクションからドキュメントを削除する時に使用するとmongoDB公式サイトに掲載されていました。
⇒db.collection.deleteMany (MongoDB Reference)
現在使用している教材と学習時間:本日の学習時間2.5時間
Udemy:MERN Stack Front To Back: Full Stack React, Redux & Node.js by Brad Traversy
★Section9:Dashboard & Profile Management
-Lec 51 List Education & Experiences
-Lec52 Delete Education, Experiences & Account(このブログ記事に書いた内容。本日はここまで完了。Section9が完了しました!)
進捗状況:72%
学習時間2.5時間
~本日は休みにしている教材~
Udemy:The Complete Web Developer: Zero to Mastery by Andrei Neagoie
進捗状況: 92%
★参考にした本★
「React.js & Next.js超入門」掌田津耶乃 (秀和システム)
Section4-1: Reduxを使ってみよう
★参照記事★
Quiita参照記事⇒react-routerのページ遷移をhandleで行う時にはwithRouterを使う


